Category: HP

  • HP DL 380 24 Bay G10 SAS Expander Tutorial

    HP DL 380 24 Bay G10 SAS Expander Tutorial

    The 16 and 24 bay models of the DL 380 G10 require a SAS expander to supply the front drive bays with SAS lanes. The 8 bay model does not require such a setup. The backplane is simply connected directly to the RAID controller. It’s actually quite rare to not see the SAS expander built into server backplanes but that was the design choice by HP for this model.

    You are first going to need the SAS expander itself which looks like the following:

    P/N AEC-83605/hp2

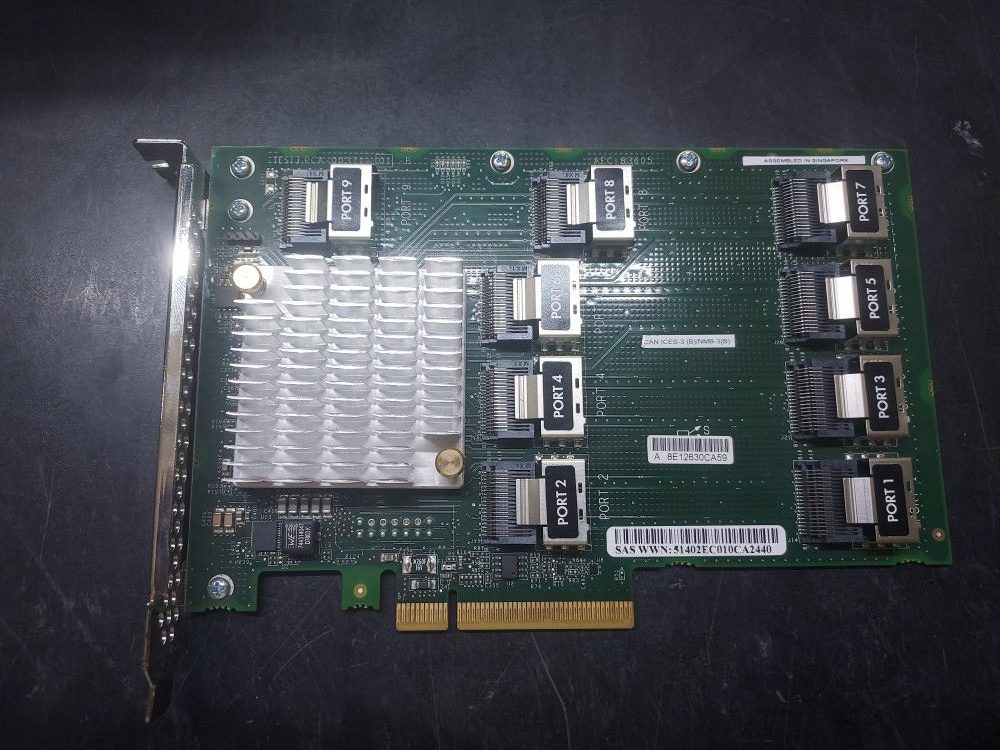
    On the card are 9 ports. It installs into Riser 1.

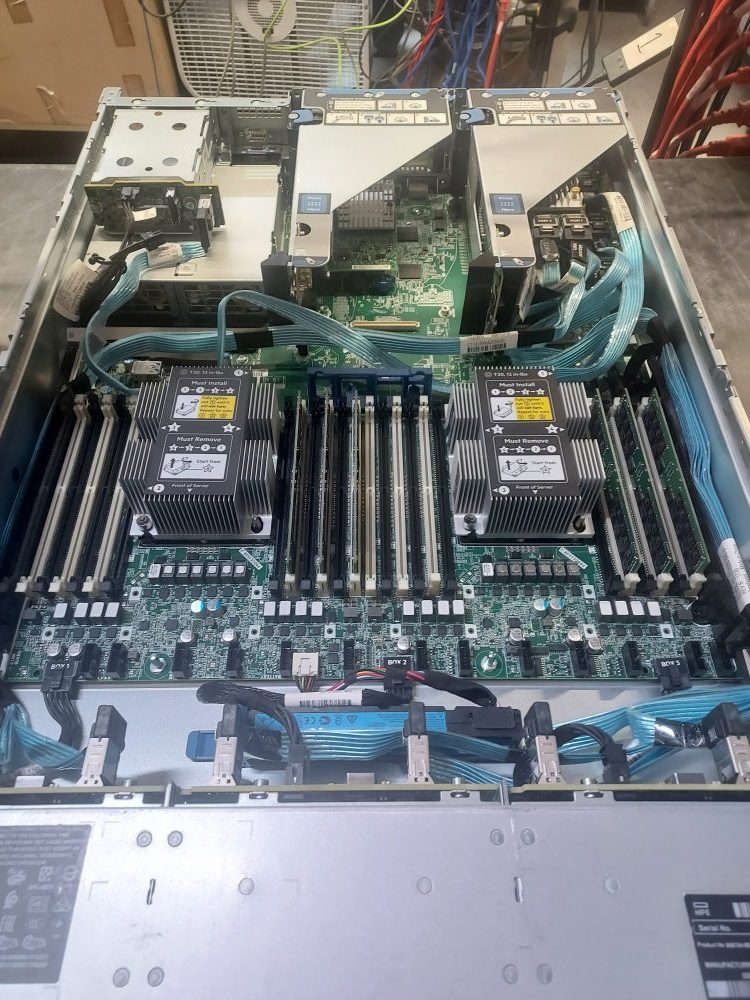
    The cables you need will route from the backplane to the SAS expander, and then connect to your RAID controller. You will actually notice 3 separate backplanes on this server. Each section of backplane are known as bays.

    From this view you can see 24 bays are split into 3 backplanes

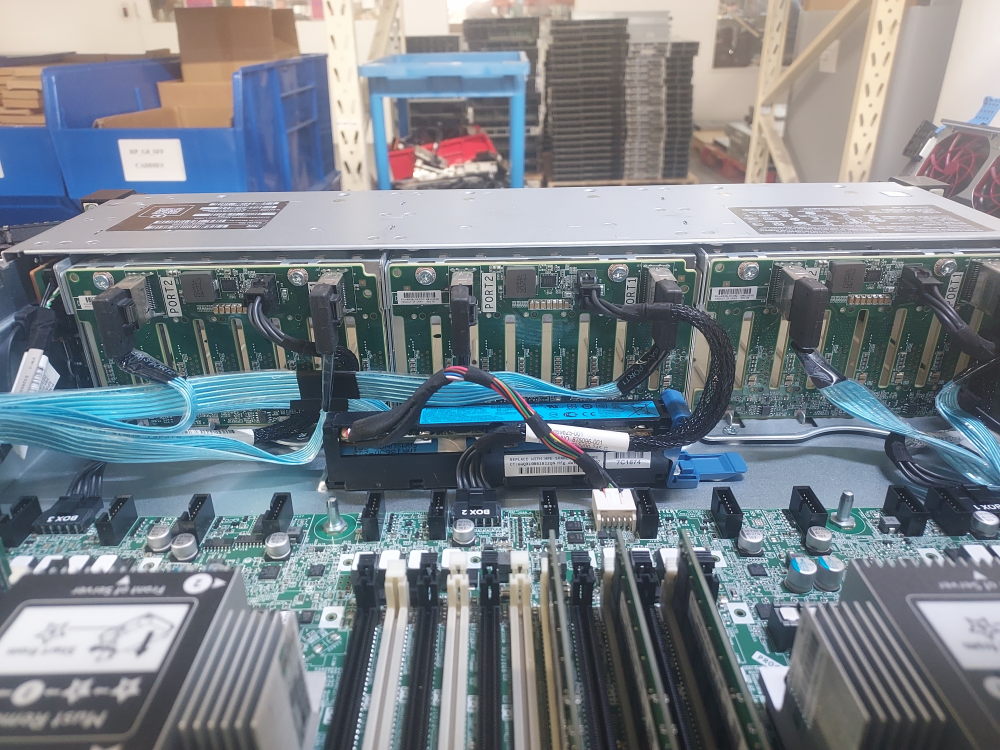
    You have Bay 1, Bay 2, and Bay 3.

    The required cables will plug into Bay 1 ports 1/2, Bay 2 ports 1/2, and Bay 3 ports 1/2.

    Here’s the first set of cables:

    HP-SAS-Expander-Cables-1_v1
    P/N 776402-001

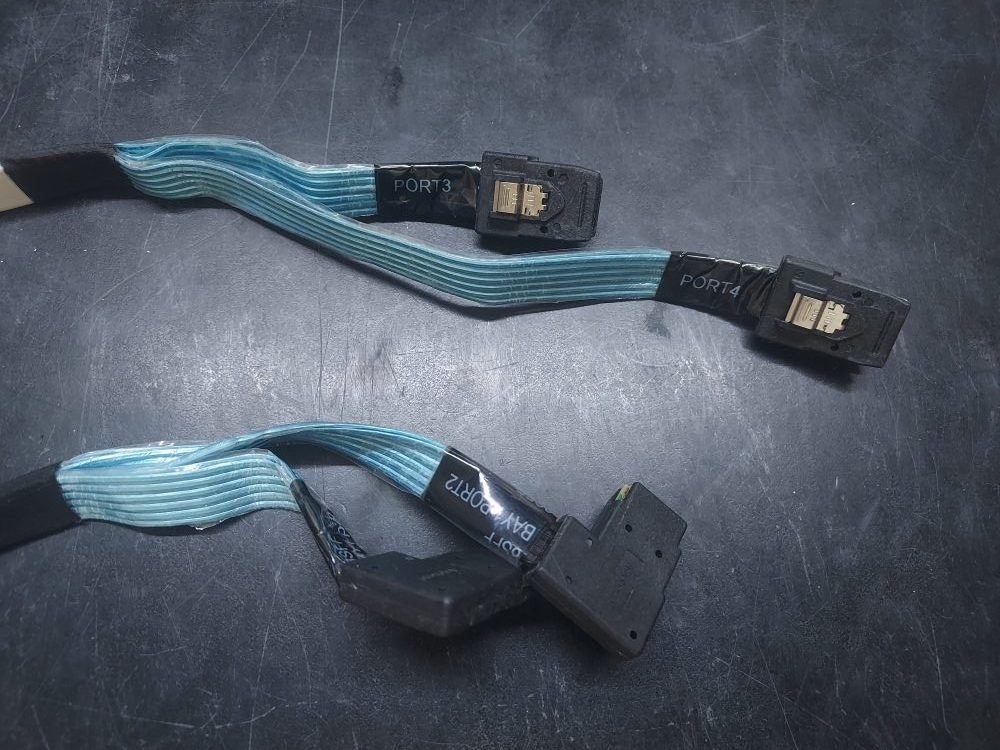
    These plug into the first ports labeled Bay 1 Ports 1 and 2. They will route along the left side of the chassis  On the expander you’ll plug these into ports 3 and 4. These are for the first 8 drive bays on the server. Note, ports 1 and 2 are reserved for the cables that go from the expander to the RAID controller. We will plug those in later.

    The next 2 bays will use the same cable. We call this the octopus cable.

    HP-SAS-Expander-Cables-G10_v1
    P/N 874686-001

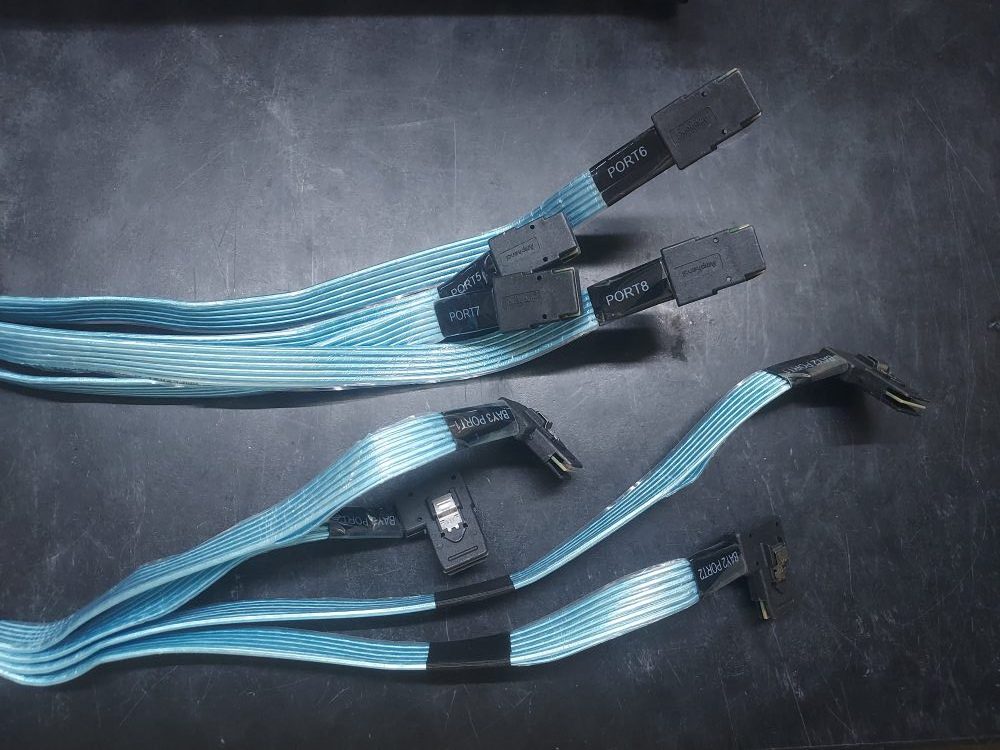
    It has 4 Mini SAS connectors on both ends of the cable. One side plugs into the other 2 backplanes on the server. The other side plugs into the SAS expander on ports 5, 6, 7, and 8. The cable will be labeled so you know what goes where.

    It’s easiest to have the SAS expander card out of the riser when you begin plugging in the cables.

    SAS-Expander-HP-DL-380-G10_v1

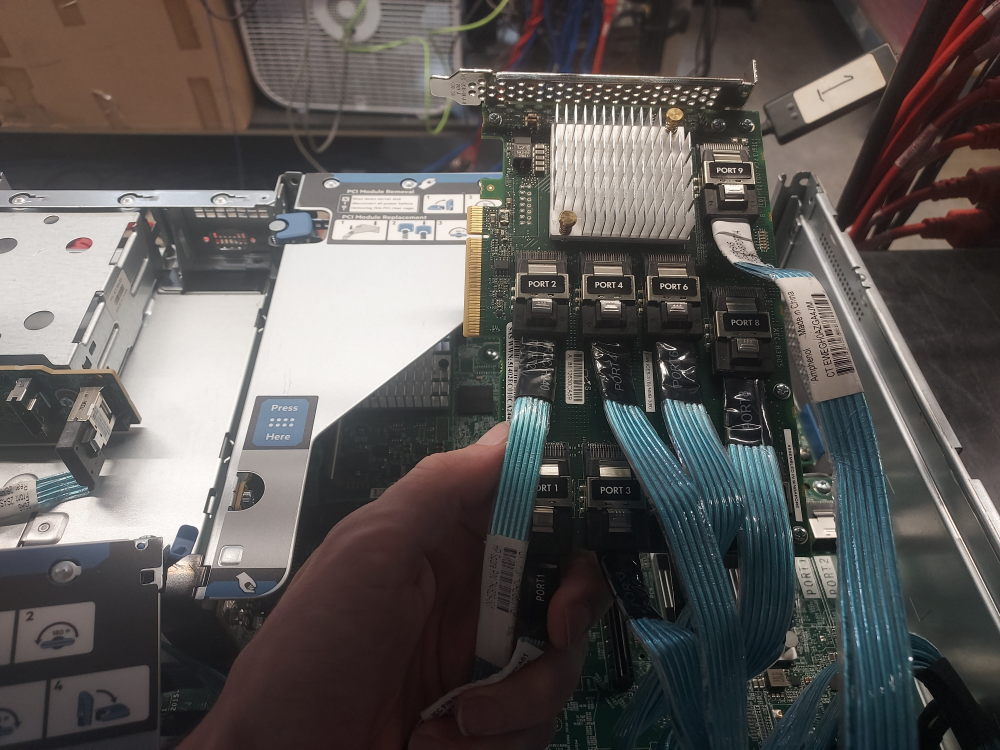
    Lastly, you have ports 1 and 2. These are individual cables that go from the SAS expander to your RAID controller. They can vary in length. There are shorter cables designed to just go from the expander to a PCIe controller in the same riser. There are also longer cables designed to reach further out to a controller installed in the Mezzanine.

    Here you can see I’m using the short cables to go from the expander right to a PCIe controller. Both the expander and RAID controller are now installed in riser 1.

    DL-380-24-Bay-Inside-View_v1

    Once you’re cabled up turn it on and verify that your server can see the RAID controller and your drives. If it’s only seeing drives in some drive bays you may have a loose cable, the wrong cable, or a cable plugged into the wrong port.


  • HP G10 Update Process

    HP G10 Update Process

    This post will describe the update process for the HP G10 platform. All G10 servers can be updated using this process. Keep in mind even though the process might be the same, individual BIOS and update packages might differ depending on the server. For example, the HP DL-360 and the HP DL-380 use different BIOS files.

    There are 2 ways you can update an HP G10 server.

    1. The traditional method is to use what HP calls a service pack. This service pack contains not only fully updated firmware for the BIOS and iLO, but also updated firmware for other devices like RAID controllers, network cards, etc. The service pack comes in an ISO format. It can be booted from a USB or can be mounted through the virtual KVM  inside the iLO.
    2. The other method is logging into the iLO and updating individual components directly. Often times you either have an outdated service pack, or no service pack at all, and can use this method instead. Try to find a service pack if you can.. In the absence of a service pack proceed to update the BIOS and iLO as individual components. HP requires a service account to download service packs so you don’t always have immediate access. Such restrictions are not applied to individual updates.

    Mounting the service pack ISO over virtual KVM

    To mount the ISO you must first login to the iLO. To login to the iLO simply note the IP address displayed at boot time:

    If no IP address is displayed please ensure your iLO interface has an ethernet cable attached. If an address outside of your network is displayed this usually means a static address has been configured and the iLO should be reset. Reset the iLO to default settings.

    Take this IP address and type it into your browser. You will be greeted with a login prompt:

    Login: Administrator

    Password: (See sticker located on top of server)

    If you are unable to login with the default credentials this is another sign that the iLO needs to be reset. Once logged in you will notice a thumbnail of the server screen in the lower left corner of the window. This is the virtual console:

    Click the thumbnail and then select HTML 5 console to launch the virtual KVM.
    You will now see the active video output of your server. From here click the little icon that looks like a CD, then click CD/DVD, then click Local *.iso file.

    Now simply browse to the service pack to mount and begin the boot process.

    Once attached, the server will attempt to boot from the ISO during the boot cycle. Wait a few moments for the server to cycle through the boot order. This is the screen you want to see:

    There is nothing more to do at this point other than wait for the update process to complete. The system may restart several times. Once completed you should verify the installation by making note of the current BIOS version. The current BIOS version is displayed at boot time and both the BIOS and iLO versions can be found in the iLO as well.

    Updating individual components

    As mentioned, in absence of a service pack components can be updated individually. The 2 most important items we must update are the BIOS and the iLO firmware.

    Let’s start with the BIOS. First, login to the iLO as described previously in this document and then navigate to Firmware & OS Software. Then click Update Firmware:

    The following window appears:

    Select choose file and then attach the firmware package for the BIOS. The latest firmware can be obtained directly from HP. The correct file will have a .FLASH extension or a .FWPKG extension depending on the server.

    You will see a progress bar indicating that the file is being uploaded. If accepted, the firmware will install.

    Flashing firmware means the file was accepted and the update process has started.

    After each update it may be necessary to power cycle the server. You can do this simply by manually turning the server on or off, or rebooting the system inside of the iLO.

    Repeat this process for the other individual components.

  • HP DL380 G9 Not Booting Into Smart Storage Administrator

    HP DL380 G9 Not Booting Into Smart Storage Administrator

    You may run into a case where a G9 server fails to boot into the HP Smart Storage Administrator. In my case the server would freeze here after hitting enter.

    It’s not actually frozen but hitting enter does nothing and your only recourse is to just reboot the server.

    Beyond that you may also notice Intelligent Provisioning appears to be completely borked. And most of the time this is the case.

    The resolution is to simply reinstall Intelligent Provisioning. Start by downloading a copy here.

    The file will come in an ISO format. Turn this into a bootable USB or alternatively just boot from it using the remote console in iLO. If you have difficulties making the USB I find booting it from the virtual KVM almost always works.

    This is the screen you want to see. You’ll get a progress bar and the whole process takes about 10 – 15 minutes. The UID light will flash blue indicating a firmware update is taking place.

    Once the system restarts you can attempt to boot into the Smart Storage Administrator once again.

    In my case I was now able to successfully boot into the software and configure my drives.

  • Invalid file signature errors on HP G10 servers

    Invalid file signature errors on HP G10 servers

    When attempting to update individual components like the BIOS, you may receive the following error:

    The file signature is invalid. Make sure you are using a valid, signed flash file and try again.

    In my case the iLO 5 firmware was at version 1.46. You can’t easily jump from such an old version to the latest version. Old versions of iLO cannot verify the signatures of the newer BIOS/firmware packages. The solution is to simply stair step the iLO firmware to the latest release and then all the other packages should easily install.

    You also cannot jump from iLO version 1.46 all the way, to let’s say, version 3.18 at the time of this writing.

    I found the following upgrade path works.

    1.46 —> 2.14 —-> 2.35 —–>3.18

    You might also try the following but it fails for me sometimes depending on the server:

    1.46 —>2.35—->3.18 etc.

    Certain version of iLO introduced capabilities to handle larger file sizes. Perhaps some servers have smaller BIOS packages hence the success of this upgrade path for some and the failure for others.

    Once the iLO is fully updated it processes the BIOS upload correctly: